Products
Solutions
Resources
9977 N 90th Street, Suite 250 Scottsdale, AZ 85258 | 1-800-637-7496
© 2024 InEight, Inc. All Rights Reserved | Privacy Statement | Terms of Service | Cookie Policy | Do not sell/share my information

InEight Estimate provides many out of the box reports, referred to as Canned or System reports, that can help you review and analyze your estimate.
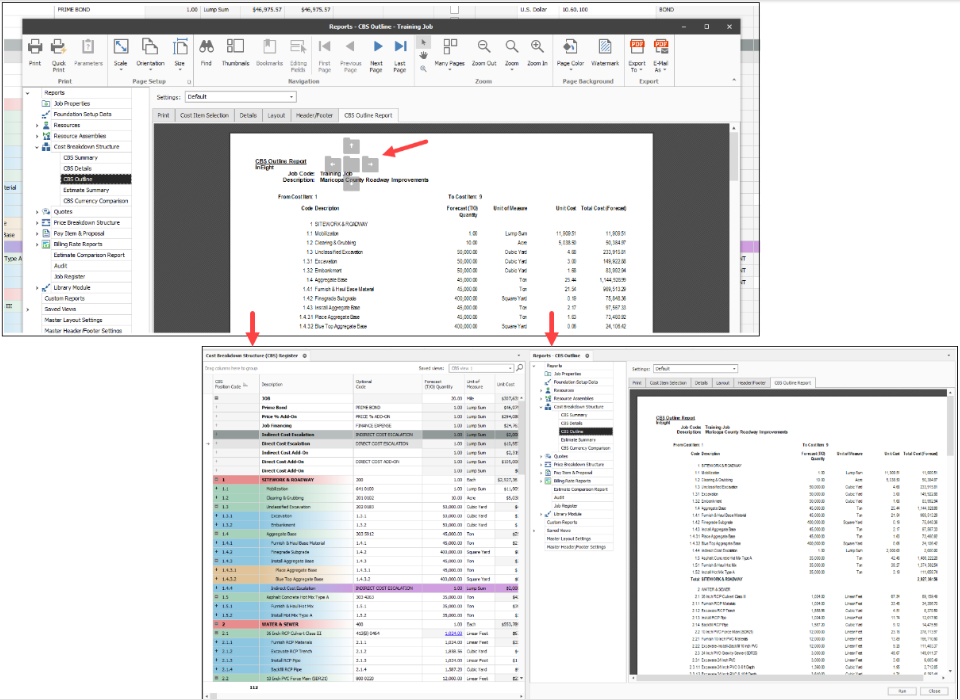
The Reports tab is docked along with the other forms and registers. This lets you continue to work with your estimate and other registers without being forced to close the Reports tab.
If the report is undocked, the job code shows in the reports dialog box header.
Most of the reports in Estimate can be adjusted to output the specific data and reporting format you need. Each report has its own set of output settings for configuring and formatting the report.
All Estimate adjustable reports are accessed from the Reports menu. You may even run the same report multiple times and choose different output settings based on what you want to see or who the intended audience is.
For example, you may choose to run the CBS Details Report several times to satisfy different needs or for different audiences, and include or exclude specific data depending on what you or the report recipients want to see.
For a group of estimators, you may want to run a CBS Details Report that shows all cost and productivity data for a job
For field personnel, you may want to run a CBS Details Report that shows no cost data, but all production and resource data
Finally, for executive management, you may want to run a CBS Details Report that shows summary level information only
The following steps take you through a brief overview of the Reports menu and how you can access it.
Open job, and then select the Setup tab.
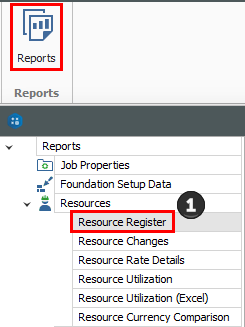
Click the Reports icon.
![]()
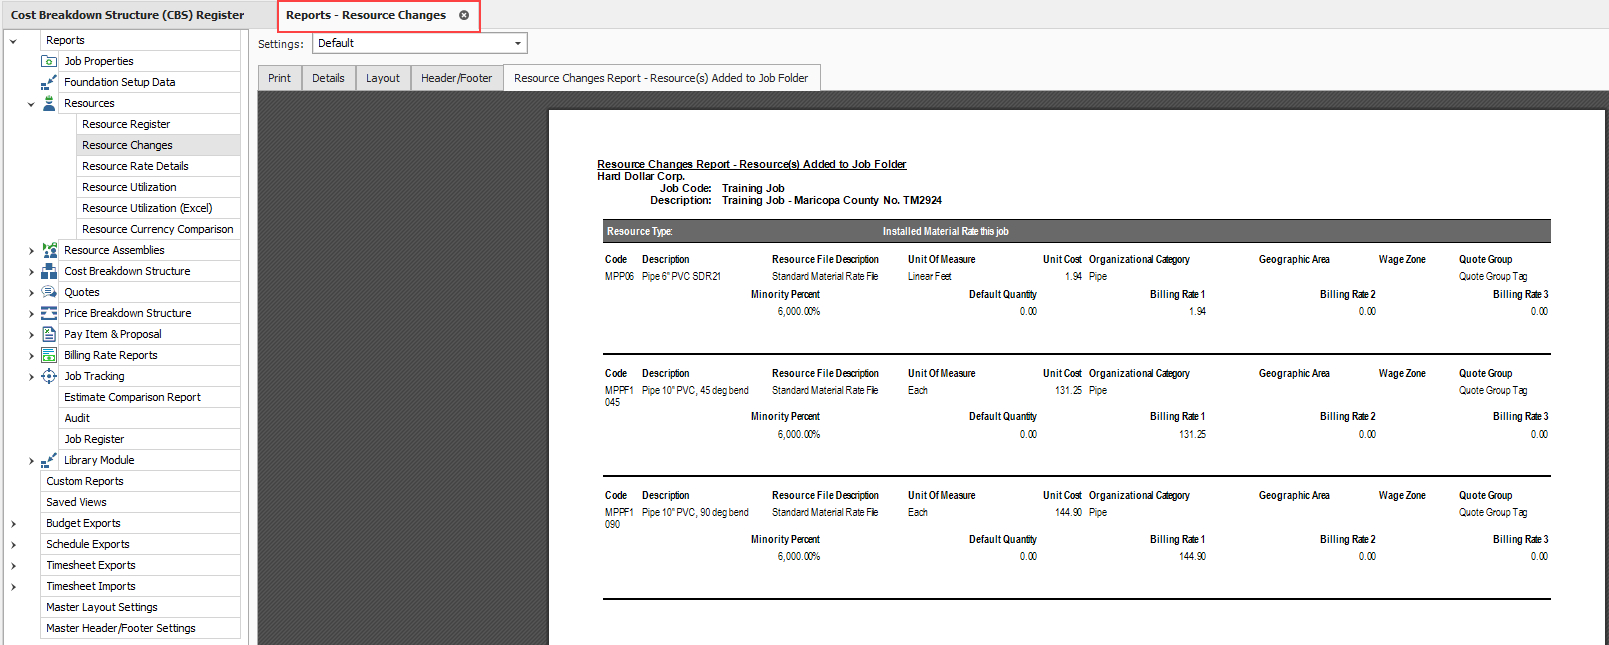
The Reports tab opens. On the left bar, a Report tree shows of all Estimate adjustable reports.
You can access the Reports menu from the Setup, Estimate, Quote, Price, and Execution tabs.
Select the report of your choice. For this example, select the Job Properties report.

A split page shows with the reports available on the left side bar.
When you select a report from the left side bar, the Output Settings show on the right side of the page where the report settings can be adjusted and the report can then be run.
Each report has the following tabs specific to the report:
Layout
Header /Footer
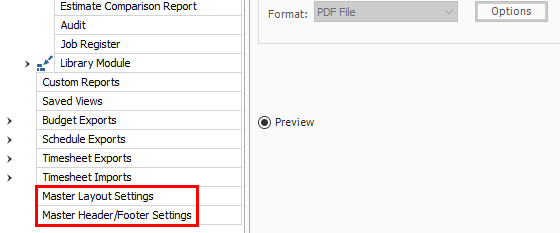
There are also Master Layout Settings and Master Header/Footer Settings located at the bottom of the left-hand side bar tree. You can define settings that apply to all reports.
This section provides a more detailed explanation of the output setting tabs.
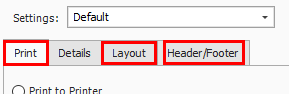
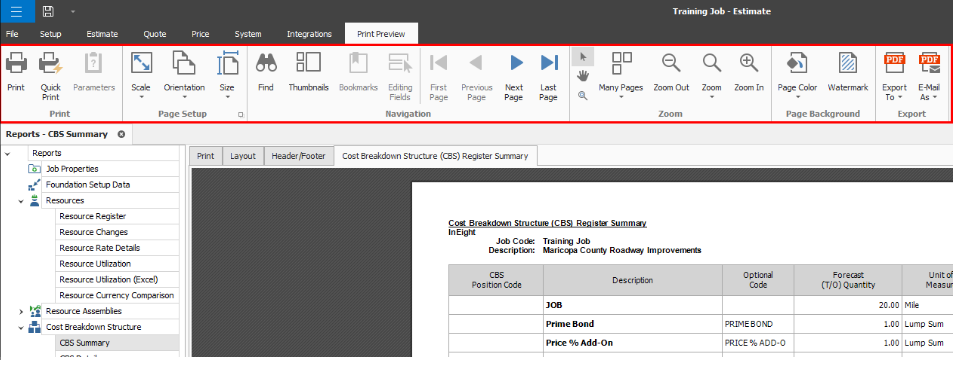
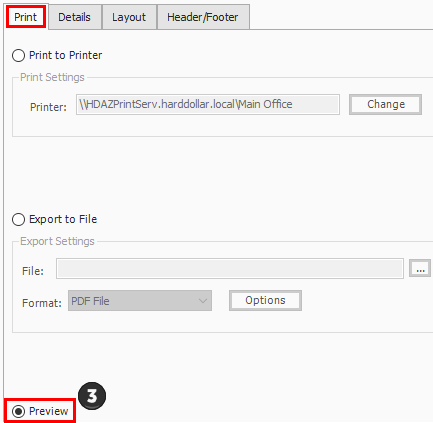
The Print tab includes three options for printing output: Print to Printer, Export to File, and Preview. Export file outputs include PDF, Excel, text, and more.
The Reports print previews opens in its own tab in the Report Dialog. This lets you keep the report open while continuing to use other parts of the application.
You can also undock and float a report on a different form, or you can tile it side by side with another register to view and compare them.
The Print Preview menu is displayed on its own ribbon. Menu commands are shown in the ribbon as a contextual Print Preview menu when navigating to Reports > Print > Preview > Run.
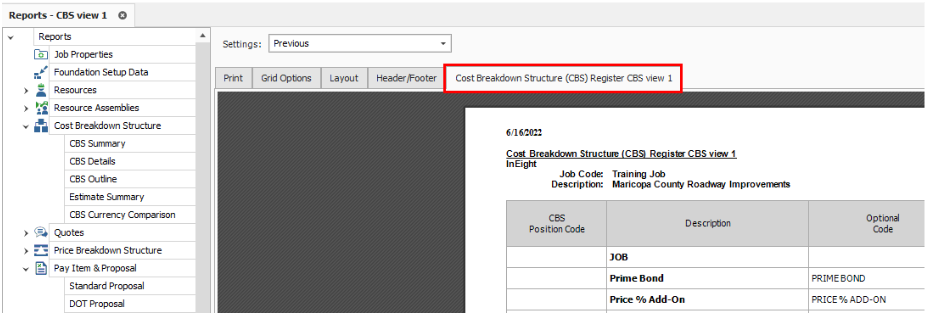
You can apply custom Layouts and header/footers to register based reports. Upon saving a view in any register, select the option to save it as a corporate view and include the view in the reports dialog box.

When selecting a Saved View from the Reports register you can use the Print tab to customize the printing preferences, use the Grid Options tab to change the font type/size, use the Layout tab to modify the design style, and use the Header/Footer tab to insert a header and footer to your report.
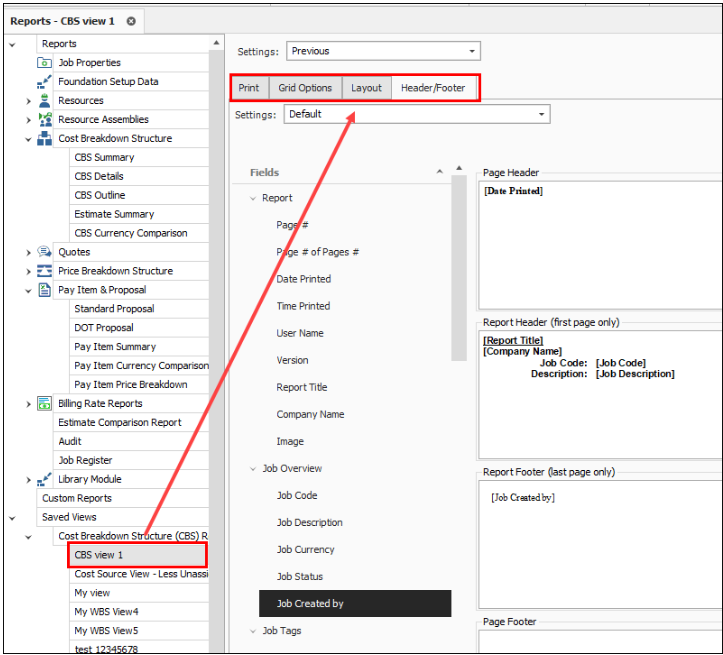
When you click on the Run button it will create a new register-style report. You can modify the layout or header/footer directly in this register. You can also toggle between any of the four other tabs to make modifications and see the changes on the saved view report.
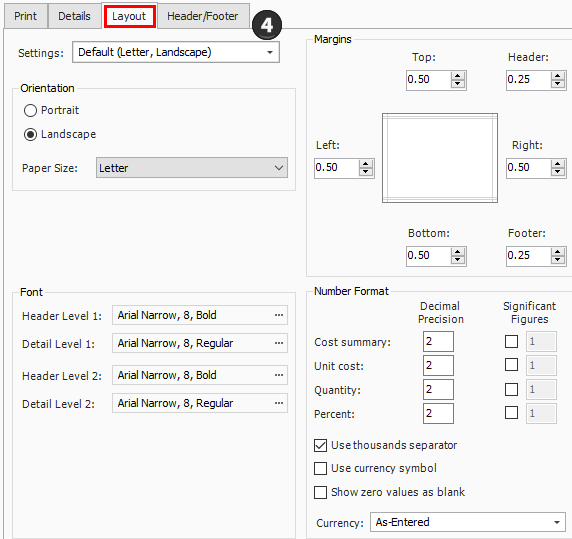
Many of the InEight Estimate adjustable reports include formatting options for the general layout of the report, located under the Layout tab of the report’s output settings. Settings for the report include: Orientation, Margins, Font, and Number Format.
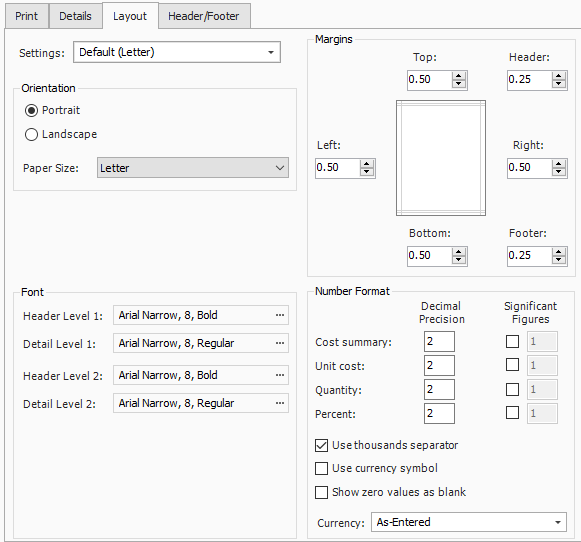
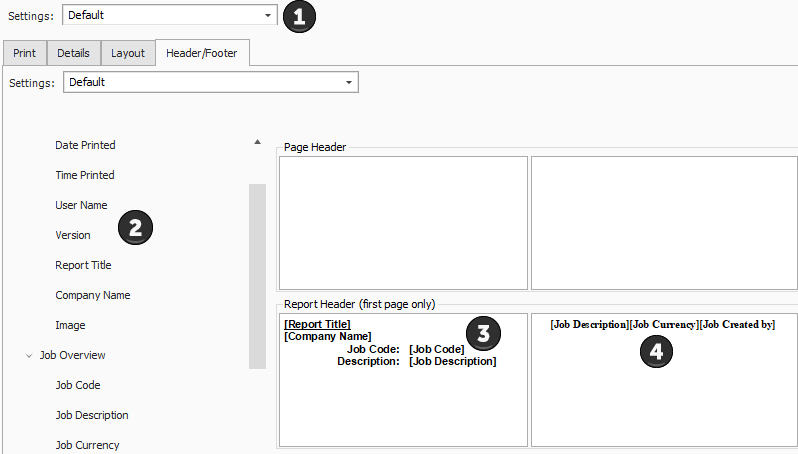
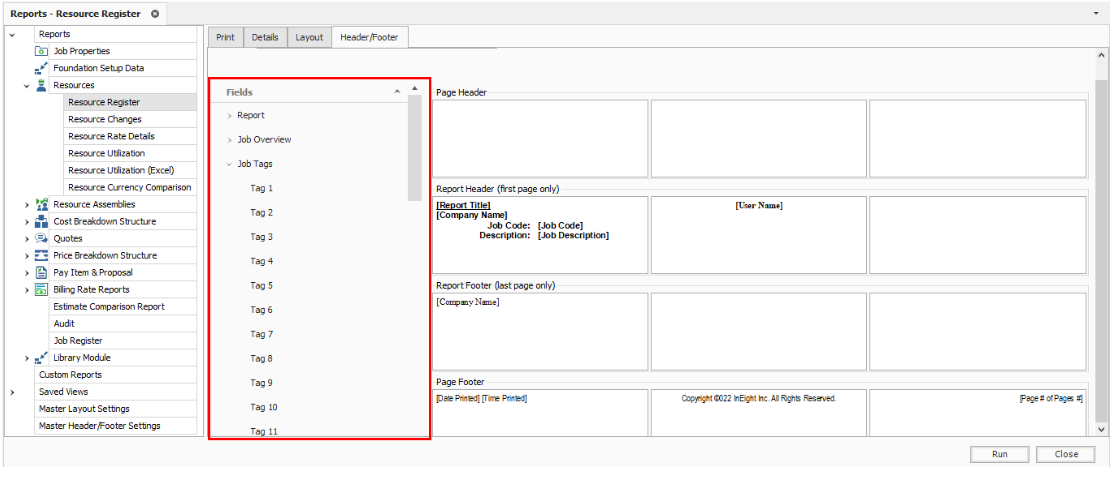
Many of the InEight Estimate adjustable reports include the option to define and insert headers and footers into the report. You can add information to the left, middle, or right of the header and footer sections of the report.
Once you define headers and footers, you can save them for use on other reports.
You can add page, time, and date stamps as needed, as well as images (e.g., company logo).
You can also use brackets to have it “stamp” the report with the Job Code and Job Description.
You can enter your own information as desired.
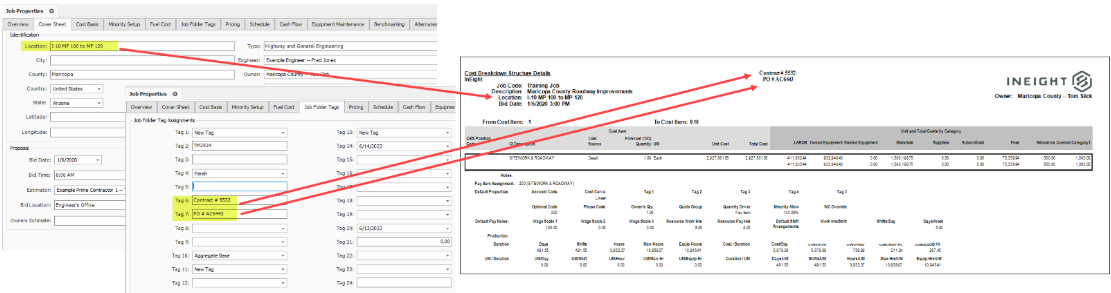
In addition to the existing job code and job description tags in Job Properties, you can use the Cover Sheet fields and Job Folder tags for your headers and footers in all standard reports.
Additional tag values such as contract numbers, work order numbers, PO numbers, company logos, or any other tag fields can also be included. These additions help you customize headers and footers to give the recipients more transparency in the reports.
A Header and Footer field menu exists to the left of the Page Header and Page Footer grid, for all standard reports. This lets you choose which fields from Job Folder Tags and the Cover sheet to include in your report.
You can customize your header and footer layout settings, save them, and re-use them in other reports.
Most reports have a Details tab with various options to configure what information is included on the report.

Once you’ve configured your settings for the report, you can save them as a custom version of that report.
The following steps walk you through configuring the settings and formatting for two different reports.
Open the Training Job and select Setup >Report>Resources.
Under Resources on the left side bar, select Resource Utilization.
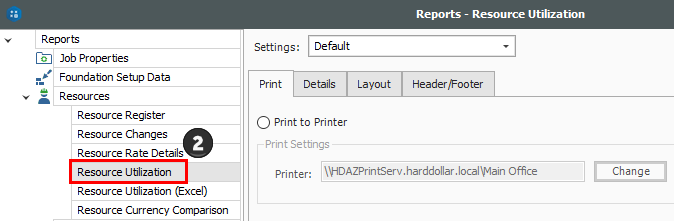
On the Print tab there are three options. A best practice is to always set to Preview so you can review before printing.
On the Layout tab you can make adjustments based on your preferences.
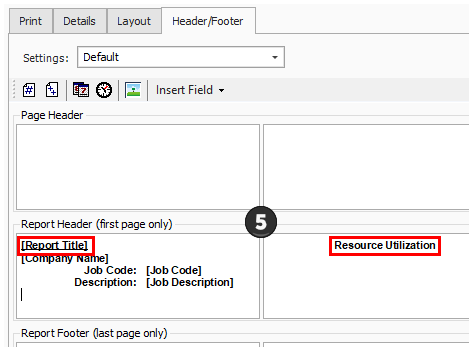
Move to the Header / Footer tab. Remove the default Report Title from the first page Header only and enter Resource Utilization in the center Report Header box as a title that will appear on the first page only.
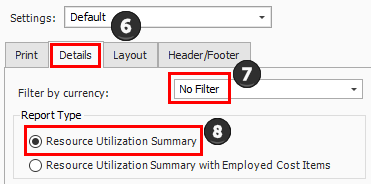
Go to the Details tab, and you can see the details and options you can select to customize and adjust the report.
For this navigation, you will not Filter by currency; leave the selection as No Filter.
Under Report Type, choose the first option, Resource Utilization Summary.
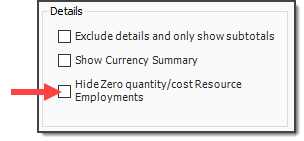
You can choose to select the Hide Zero quantity/cost Resources Employments Details box if you prefer to have your printed report not show any resources that have a dollar value of zero
You can choose if you want the report at a summary level, or if you want it to reference your cost items when you are looking at a resource
If you choose Resource Utilization Summary with Employed Cost Items, it adds CBS position to the structure of the report
You would select this if you wanted to see cost items and resources by the cost item
The Details settings are “sticky” features, meaning they default to what was selected the last time.
You can use grouping to group by different tags and user-defined fields. Most of them are related to the Resource Rate Register, for example: Geographic Area, Organizational Category, Wage Zone, etc. For this example, group by Resource Organizational Category.
Next, you can choose the resources you want to see. For this example, select the Labor and Construction Equipment Resource Types.
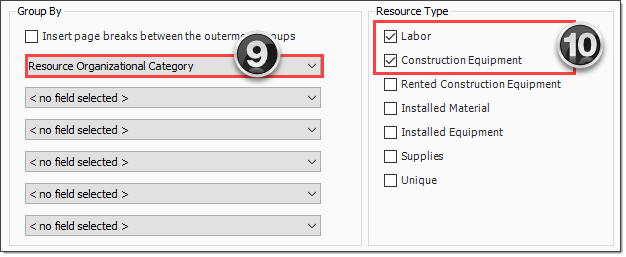
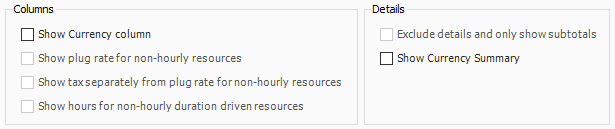
For this example, you will not make any selections under Columns or Details
This is just one of many ways to organize and adjust your report.
Click Run to run the report.
This report can be helpful for seeing your utilization hours, broken down by regular time and overtime hours
Click the red X to close this page and open the Construction Equipment page.
Click the red X to close the Construction Equipment report.
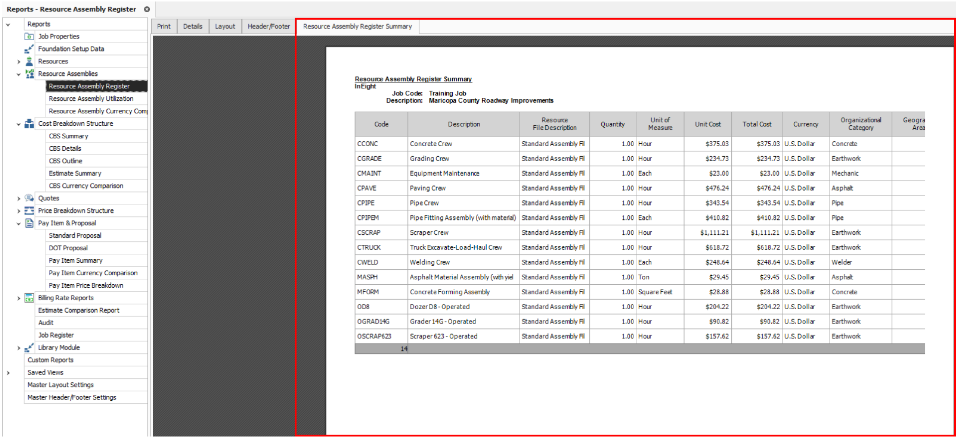
Open the Training Job and select Setup >Reports, then expand the Cost Breakdown Structure node.
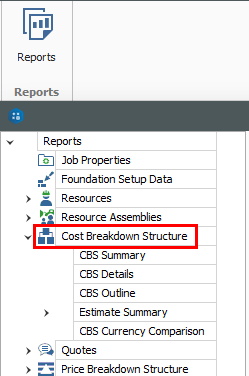
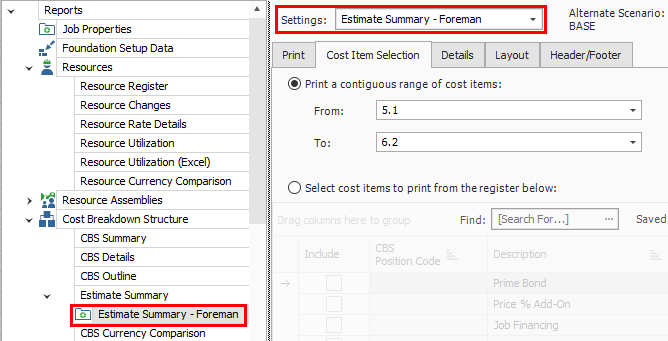
Under Cost Breakdown Structure on the left side bar, select Estimate Summary.
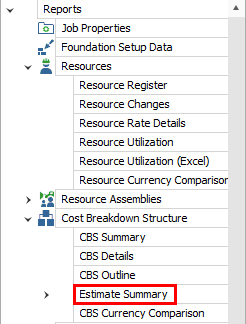
Along with the Print, Details, Layout, and Header / Footer tabs, there is an additional tab called Cost Item Selection. Select this tab.

The Cost Item Selection tab allows you to report on a selection of cost items:
Print a contiguous range of cost items: Allows you to print a series of cost items in a row. In this case, print just items: select 4.1 in the From field and 4.3.2 in the To field.
Select cost items to print from the register below: Allows you to use column filters to select the cost items to include in the report; leave this button unselected.
You can roll up your cost items to a certain CBS level for the report as well, depending on the level of detail you need.
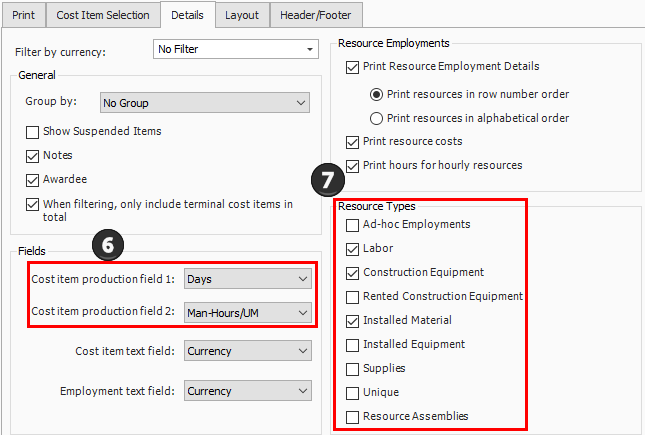
On the Details tab, select Days for Cost item production field 1, and Man-Hours / UM for Cost item production field 2 (this report allows you to report on two production values).
Under Resource Types, uncheck all of the boxes except Labor, ConstructionEquipment, and Installed Material.
Leave the rest of the settings at their defaults, then select the Header / Footer tab.
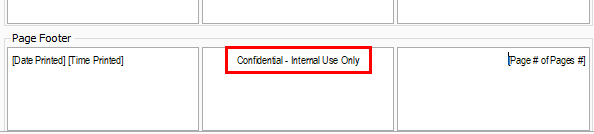
In the center Page Footer field delete the existing text, then type Confidential –Internal Use Only.
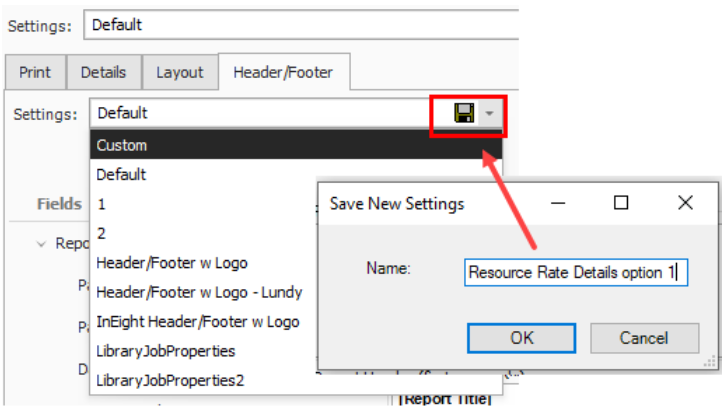
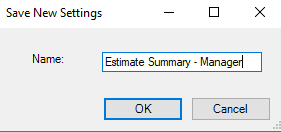
To save the settings you’ve configured, click on the Settings drop-down arrow above the output setting tabs.
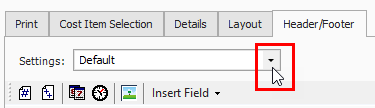
Select the Save disk icon to save the new settings.

Type Estimate Summary – Manager.
Click OK.
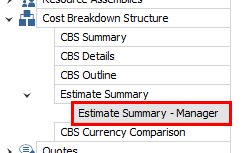
Notice that a custom version of the report now displays under Estimate Summary on the Reports tree on the left
Under the Price Breakdown Structure Report node, the PBS Summary Report gives a good overview of how your price breaks down by cost category. This provides a high-level overview that is cost category driven, providing information based on the total value of the project.
When selecting your settings on the Details tab, a best practice is to select and include:
Cost Categories
Markup Rate
Percentage of Cost
This allows you to see your costs and markup broken out by cost category.
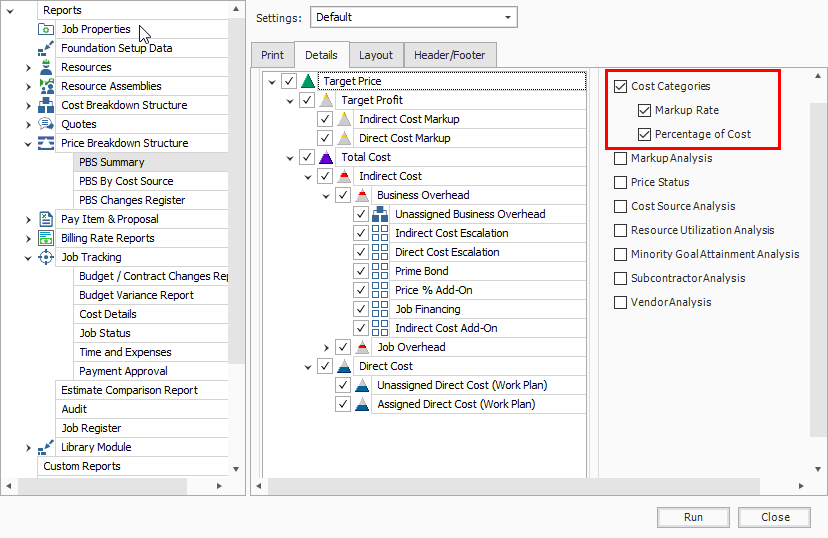
You can also select to show markup rate and what percentage the markup is of your cost.
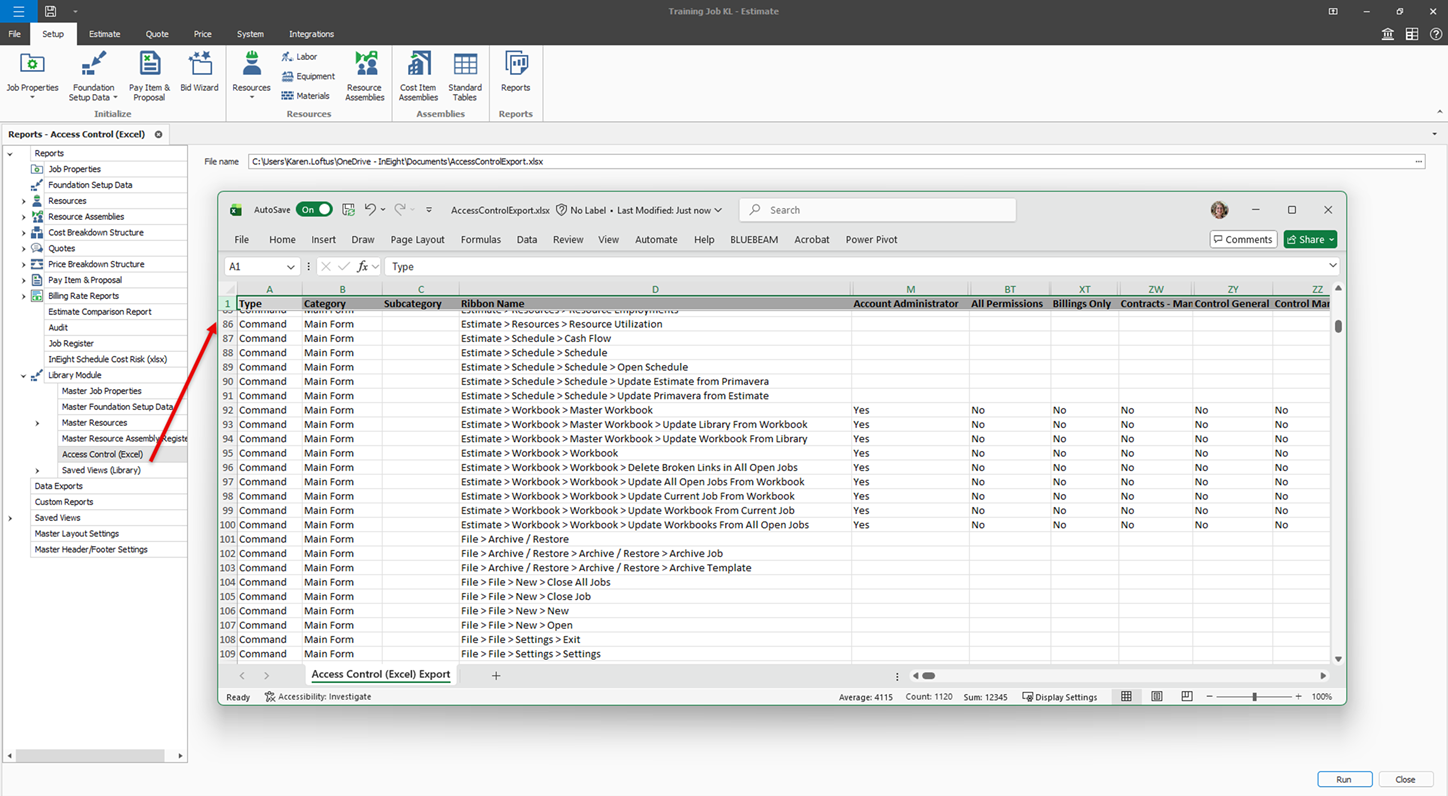
You can use the Access Control report to audit user permissions, command access, and various restrictions without having to search through the Access Control register for this information.
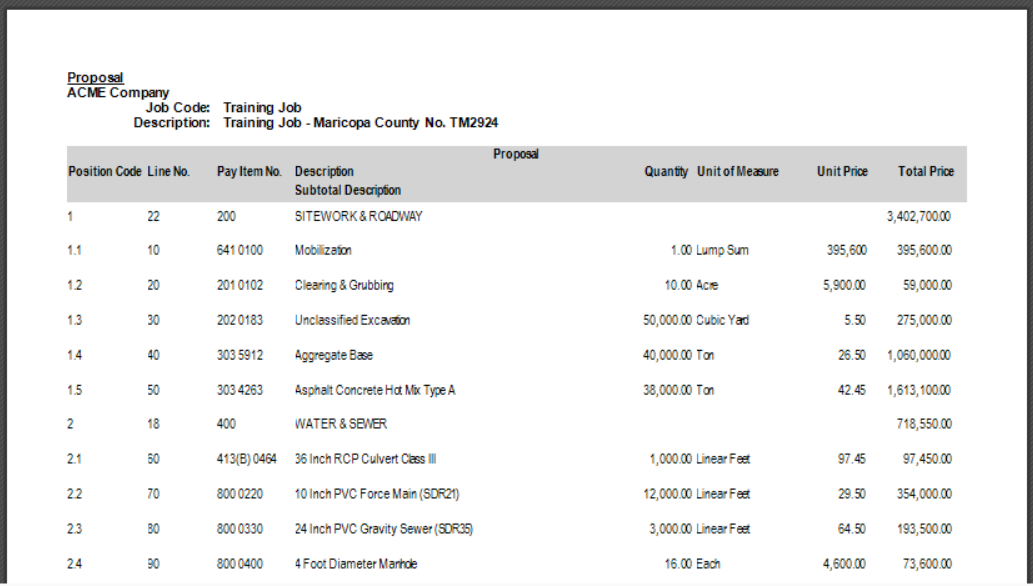
Located under the Pay Item & Proposal report node, the Standard Proposal report can be used for contractors required to submit a pricing proposal to a client. It lists all the pay items with the client provided quantities and your final pricing. You can include subtotals (defined on the Pay Item & Proposal Register), cover sheet information, and a signature block.
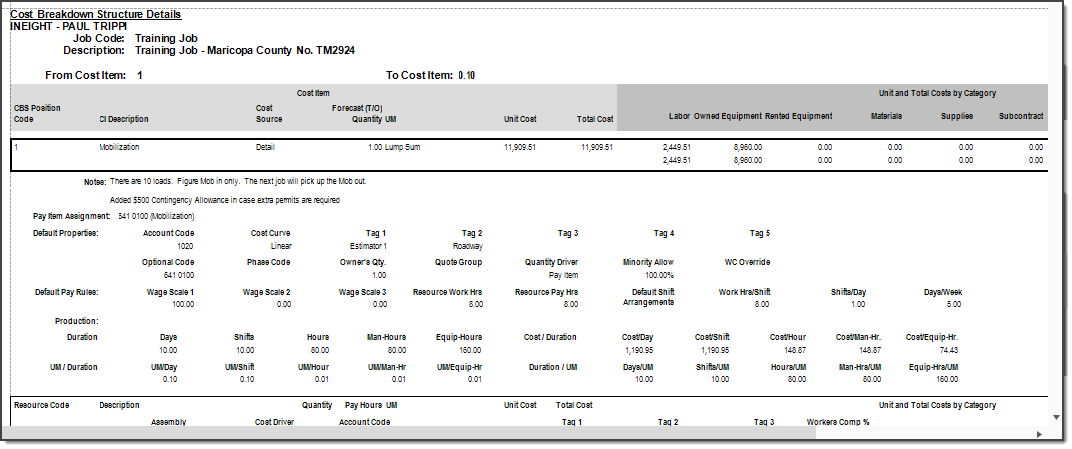
Under the Cost Breakdown Structure report node, the CBS Details report can be a helpful report for bid review. On the Details tab you can include or not include any of the information contained in the CBS Register, including cost items with production, costs by category, shift arrangements, resources, and notes.
Under the Job Tracking node, the Audit Report is a very important report to run during estimate review to make sure you didn’t leave anything out of the estimate. It checks for a number of potential errors in the estimate, including:
Zero Price Pay Items
Zero-value cost items
Pay items without Cost Items assigned
Resources with a quantity of zero
Additional Information
9977 N 90th Street, Suite 250 Scottsdale, AZ 85258 | 1-800-637-7496
© 2024 InEight, Inc. All Rights Reserved | Privacy Statement | Terms of Service | Cookie Policy | Do not sell/share my information